template

Friday, October 25, 2013

That delightful aroma of a fresh cup...

Is there anything better than the smell of a freshly brewed cup of coffee? It's pretty high there on my list of favorite smells,  so when I saw this idea I pinned it to try sometime. That sometime was this week! 

The previous pinner said "I placed a vanilla tea-light in with the beans and was wanted by a lovely French vanilla coffee aroma." Well that sounds awesome I thought to myself.  Although I've meet been a huge fan of flavored coffee or candles so I thought I'd try just plain unscented lights instead.  

PINTEREST FAIL

I'm pretty sure this pinner ONLY smelled the  heavily scented vanilla and no coffee because I got nothing.  No vanilla and definitely no coffee. I did have the lovely ambience from the candles though.  Better luck might time. 

Saturday, October 19, 2013

DIY Hanging Mail Organizer

This was the first thing I pinned onto a board entitled "Organize My Life Beautifully"... and then promptly didn't organize my life at all... instead I switched jobs, bought a new house, moved, and had a baby and my life got a little less organized. However, we are settled into our new place and my son is now almost 7 months are we are getting back on track. In fact I think all the boxes are even unpacked now!

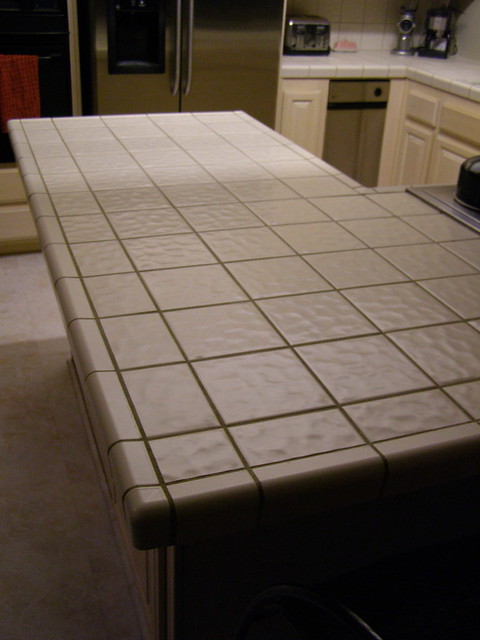
In any case this was a CHEAP (and easy) project that fulfills a need. My counter & desktops typically have been looking like this as of late: 

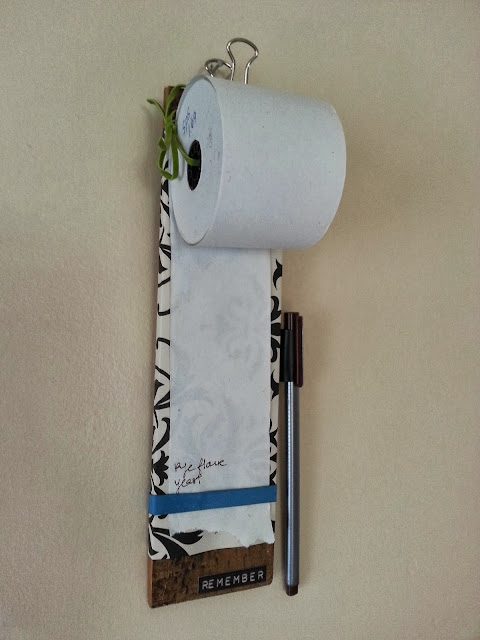
And I kinda wanted them to look more like this:


Enter the Hanging Mail Organizer. I should also mention that aside from hating clutter, I also despise dusting. Something I think was perhaps was drilled into my subconscious after many spring cleanings and visits from Grandma throughout my childhood. Dusting was the WORST job! So I didn't want a mail organizer that was another filing system to sit on the desk, but something I could hang on the wall and not have to dust around.  This one was straightforward and and inexpensive.

Total Cost: $1.00 (for the picture frame which I picked up at the thrift store)

Lucky for me this frame already had the perfect worn chabby-chic style I was looking for so I didn't even have to take the time to paint it. But I've seen this done with lovely vibrant colours as well. Really you can make it fit with whatever is going on in your house.

Supplies Needed:

Picture Frame
Fabric  to fit the size of your frame (& trim if you desire)
Staple Gun or Glue

Step 1: Cut your fabric to size with enough spare to wrap around the edges.

Step 2: Accordion fold to create pockets (whatever depth you desire) I wanted deeper pockets for mail, but you could also use more shallower pockets for jewelery or keys, or business cards. And line up any trims desired.

Step 3: IRON. As mentioned in previous posts. I dislike ironing with a passion. But in this case it will only even have to be ironed once and it makes a big difference to the final project.

Step 4:  Staple (or glue) your fabric around to the back. A Staple gun was handy for me, but my staples were a little deep so they poked through to the front. I had to staple close to the edge to hide them
behind the frame. It worked. Next time I would use shorter staples, or a glue gun would probably do the trick just fine!

Step 5: Assemble, Hang, Organize!


Finished Project!

Pin, Lose or Draw? Let me know what you think :)


Friday, October 11, 2013

Baby Led Weaning

Pinteresting Post of the week... Baby Food!

Our little guy is 6.5 months now and ready more than ever for solid food. Like leaping at the plate ready! As soon as he gets put in his highchair he is leaning as far forward as he can possible be with both hands reached out towards the table and his plate of food.

The basic idea of baby led weaning (BLW) is that rather than introduce your baby purree's, followed by mash, followed by bigger lumps, followed by solid food. You just go straight the solids! a.k.a. food introduction for the lazy mom :) Except that it's NOT the lazy way at all and right now creates a big mess as he learns how to navigate the 6-8 inches from table to mouth. Quite a bit of food currently ends up on the floor (we don't have a tray on our highchair it pulls right up to the table - which is great for storage and the eventuality that he will be at the table, but currently his pocket bib doesn't quite do justice what a tray might catch)

In any case, I'm always on the hunt for BLW ideas that will provide the nutrition he needs with the least amount of mess. Enter: Cucumber Ring! Someone had the ingenious idea to cut the seeds out of the middle (wasn't me) but this is AWESOME! Keeps him happy, busy, and healthy, and a nice slice of cold cucumber does wonders on the teething gums as well, double rainbow bonus :)


Another brilliant idea that I've found and cannot take credit for is:

The banana with a peel handle (no mushed banana here) This runs a close second to the cucumber ring.

Wednesday, October 02, 2013

DIY Never-ending Note Pad

Since I am definitely an old-school kinda pen and paper girl who still uses a grocery list at the store and only very recently made the switch to an e-calendar (mostly so that my husband and I would be on the same wave-length again) this appealed to me :)

Actually it reminds me of my grandma who, when I was a child, I remember having one of these hanging off the wall in her kitchen. Who'd thought to make their own! Now I won't have to take the time to fold and rip pieces of computer paper into appropriately sized smaller pieces that I can clip to the fridge to keep my running grocery list on.

All you need is a roll of paper (any office supply store), a piece of wood, a scrap of scapbooking paper, an elastic band, some glue or tape, a ribbon, and one of those black monster clip things... (what are they called?) It comes together QUICKLY! Like maybe 15 min. Quick and Simple.

So here was the "Pinsperation" for this week's DIY. A hanging never-ending notepad.  And the end result on the right beside it. I think this is a winner :)  (Just ignore the awful peach colour walls in the photo... that will be another weeks project)