template

Showing posts with label paper crafts. Show all posts

Monday, February 17, 2014

Valentine's DIY

Cut out hearts from places you've been together for a fun Valentine's worthy art piece that has an extra personal touch!

Thrifted Frame $10
Poster board matting $2
Map printouts - free!

You can easily out this together and it's a fun memento of places you've been with your sweetie ♥

Monday, December 02, 2013

Reusable Advent Calendar

'Tis the Season! 

I LOVE Christmas. The sights, sounds, and smells. The cozy feeling of settling in front of a fire with a warm mug of tea, (hot chocolate with Baileys...)  The business of downtown streets with shoppers looking for that perfect gift. I know, I know, who really likes the business... but I must admit I do. I don't particularly love the traffic that goes along with it, but thethe hustle and bustle on the sides walks I do enjoy. I love getting cozied up in sweaters, scarves, and boots. It's a lovely time of year.

I also love the anticipation. The waiting. The enjoying of every day leading up to the BIG one. So what follows is a DIY Re-fillable Advent Calendar.

Supplies Needed:
24 wooden clothes pins
1 - 1 x 6 x 4ft plank of wood
Wood Glue
Sandpaper
Number Stamps - (I used ones I had made out of corks. You can find the post for that here: DIY Stamps)
Red & White Paint 
Sparkles, Glitter, Ribbons, etc

Instructions:

Step 1 - Paint all your clothespins. I pinned them onto an old box so I could do the sides and everything all in one go. Don't worry about the backs you'll be gluing them down later. I did a mix of all red, white with sparkles, and plain wood with little snowflake punch outs.

Step 2 - Paint your board & let that dry completely dry (a few hours depending on the type of paint) I used some leftover house paint which actually dried super fast. I needed two coats to get a nice matte finish.


Step 3 - Finish off your board by added your number stamps and possibly some distressing with sandpaper if you like that look. With a 4 ft board I spaced my numbers a little less than 2 inches apart to get a nice even spacing. It's worth it to measure and mark this off to get it even. Otherwise you'll end up with a wonky looking board

Step 4 - Glue on your pins. Plain old wood glue works like a charm here. Make sure your pins paint is completely dry before gluing. And again, marking off your spacing will help keeps things looking neat.

Step 5 - Fill with treats of your choice. Chocolates, small gifts, notes, letters, or even spell out the advent story in 24 days to read aloud each day (Find a link for that story here: Advent Story)

Merry Christmas!!

Wednesday, November 20, 2013

Glass Jar Picture Frames

Catching up from last week's missed "Pinteresting" craft of the week.  

I like this because the photos are so easy to change (easier than picture frames even! - and that's saying something) AND you can keep adding to your collection whenever you get an interesting jar. I'm particularly smitten with the tiny jar from a sample of maple butter my sister gave me once <3 p="">


Wednesday, October 02, 2013

DIY Never-ending Note Pad

Since I am definitely an old-school kinda pen and paper girl who still uses a grocery list at the store and only very recently made the switch to an e-calendar (mostly so that my husband and I would be on the same wave-length again) this appealed to me :)

Actually it reminds me of my grandma who, when I was a child, I remember having one of these hanging off the wall in her kitchen. Who'd thought to make their own! Now I won't have to take the time to fold and rip pieces of computer paper into appropriately sized smaller pieces that I can clip to the fridge to keep my running grocery list on.

All you need is a roll of paper (any office supply store), a piece of wood, a scrap of scapbooking paper, an elastic band, some glue or tape, a ribbon, and one of those black monster clip things... (what are they called?) It comes together QUICKLY! Like maybe 15 min. Quick and Simple.

So here was the "Pinsperation" for this week's DIY. A hanging never-ending notepad.  And the end result on the right beside it. I think this is a winner :)  (Just ignore the awful peach colour walls in the photo... that will be another weeks project)


Saturday, September 28, 2013

Cork Crafts!

So I had this gigantic pile of corks leftover from my wedding...
At the wedding they were turned into these:
And then I had all sorts of cork dreams like these: 

But ultimately I decided on this project because I've always wanted a stamp set, but have also always been too cheap to spend the $$$ on getting one... Probably once you factor in the time of carving the whole alphabet it's worth it just to get the stamp set, but this is definitely more fun!

Pin Lose or Draw? You decide!!


How'd I do?
  
pollcode.com free polls 


Wednesday, September 18, 2013

Envelopes!

I LOVE making & receiving handmade cards and handwritten letters. I'm pretty lousy at the handwritten letters part, but I have a stash of cards just ready to have the perfect occasion come up to send them. When I sit down to make one card I often end up making a few more just because the creative mood as struck. 

If there is one thing to be said for store bought cards though is that they come beautiful bound with matching envelopes the perfect size to store its contents. Oh Hallmark...

I have a whole board on Pinterest devoted to fun card ideas, and have lately realized that there are some mighty cool envelopes out there as well just ready for the making. So I decided to try a couple different styles. Here you go, let me know what you think, if you would use one over the other and definitely pass on some other sweet envelope designs that you have come across.

Envelope #1


This envelope was EASY PEASY and looks beautiful and intricate upon complete. It's really so simply.

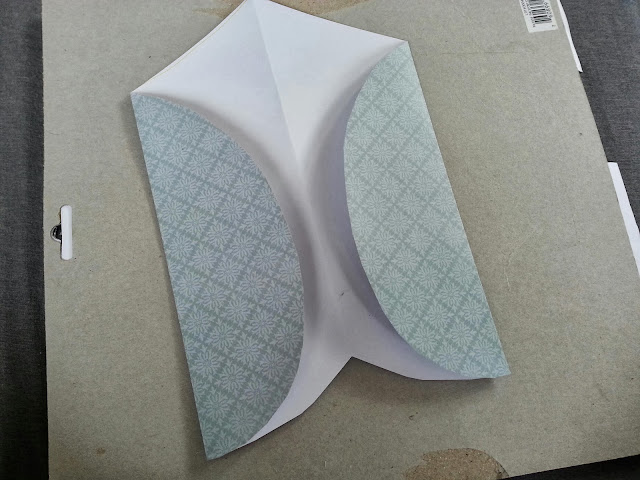
  • Cut out 4 circles on the paper of your choice
  • Fold in half
  • Overlap them like closing a cardboard box
  • Glue in place
  • Done :)
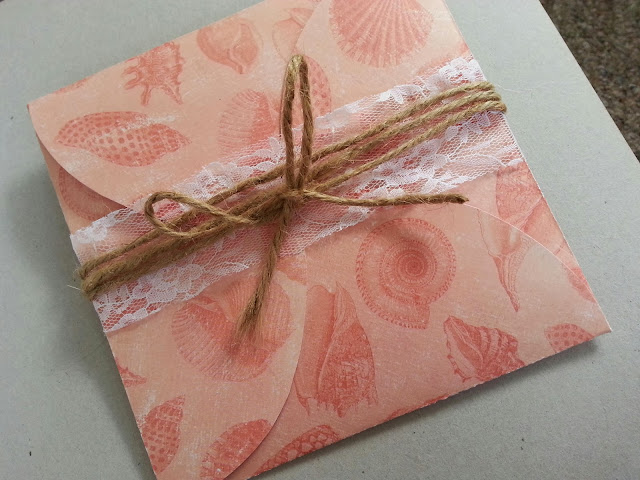
I added some fancy fibers & ribbons to fancy this one up a bit, but you could definitely just fold it down and be done with it if you were in a rush. I also think this would be pretty sweet with multiple different papers, textures, and colours to add some pizazz. You can have some much fun with this design. 

Another BONUS to this one is that it's almost like a little gift box! You could stow a pair of earrings or other small gift inside the envelope to add that little something extra :)
I will definitely be using this design again in the future. You can easily make any size you want. Mine was big, but I think some small ones would be uber cute too.

Pin, Lose, Draw? Definitely a WINNER!


Envelope #2


This was was also so simple, who knew that the HEART was the secret to the perfect envelope shape! 

Envelope #2 took me back to elementary school where I first learned to draw a symmetrical heart. 

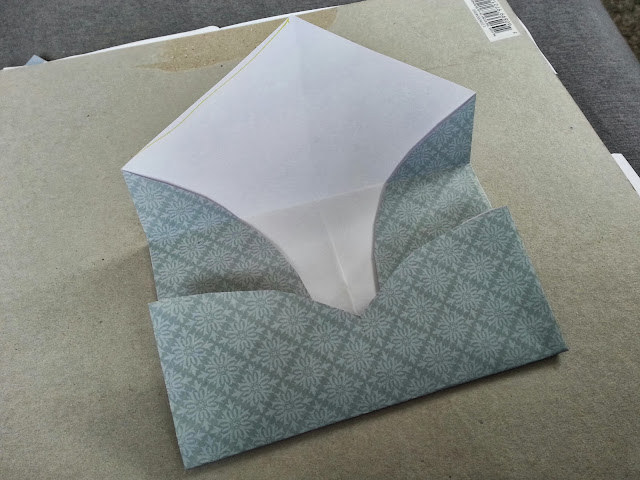
1. Fold the paper hot dog ways (as opposed to hamburger fold)
2. Draw half a heart
3. Cut out = automatic symmetry
After making your heart shape fold in the sides, fold up the bottom, glue in place, VOILA! You have pretty much the quickest, easy, envelope ever.

I dig this one a lot. But I did notice a downfall... I cut my heart on a 12x12 piece of scrapbook paper and my ending envelope size was not as big as I was expecting... You definitely couldn't fit a normal size card in there, but you could fit a lovely handwritten note for sure. AND if you knew ahead of time your envelope size you could make a card to match (not to future crafty self...)

Pin, Lose, Draw? I vote this one a WINNER due to least materials, quickest time, and ease of making. But it's not my favourite for a special occasion.


Well folks, there you have it. Two different envelope styles. I'm pretty stoked to stockpile my envelope stash to match my card stash now. May I (and you) never again get into the pickle of having a card without an envelope :)